Monday, 20 March 2017

19th March 2017


Saturday morning and off to Highland Galvanisers in Cumbernauld to collect the chassis and bulkhead, all of which came nicely gift wrapped

Ready to be unwrapped
As I mentioned in an earlier post, due to a production error at Highland Galvanisers the chassis ended up being prepared for powder coating after it was galvanised. Realising the mistake I was given the option of free powder coating which saved Highland Galvanisers the cost of having to strip the chassis again and re-galvanise it.

The Powder coating really makes the chassis look new


Unfortunately when the chassis was palatalised and wrapped for shipping it was upside down so before setting it on to some axle stands I had to turn it over. Once again the engine crane came in handy and I was glad that I had bought a 2 ton crane rather than a lighter one.


During the course of last week I ordered all the bits that I would need to rebuild the chassis to the stage where it would have suspension and steering.

The first parts to be delivered were 2 new rear springs. These springs are much heavier duty than is found on most land rovers (ANR 3540) being rated at 430 lbs each. When sourcing them I found that  Island  4 x 4 had them on offer at half the price of some of the larger suppliers - in fact not many suppliers actually offered them as a available part. 

Before ordering the springs I found that there was very little information available about them on line, probably due to the fact that they are not a common part. Having contacted a number of suppliers I was unable to find out what height the springs should be when new and therefore I was unable to compare the new height to the height of my existing springs to see how much they had settled. 

While there is no apparent damage to the original springs they are heavily coated in rust which in itself is perhaps not a major problem, but as I am replacing the front springs and all 4 shock absorbers I decided that the opportunity to get new rear springs at a reduced price was too good to pass up on. 

New rear springs

Chassis set up under cover for the rebuild
With the chassis back it is time to start refurbishing the front and rear axles. Having checked the back lash on the differential there is very little movement in it and well within the 10 mm tolerance quoted in the workshop manual. As the diff turns freely without feeling rough I do not intend to strip it at this stage, but I will replace the seals and bearings along with the brake disks. Hopefully the callipers and back plates can be refurbished which will save a few pennies!

Draining the oil from the rear axle ready for stripping and rebuilding
The bulkhead also came back from the galvanisers. I had been concerned that it may warp given the heat of the galvanising process, but it looks to be pretty straight. One thing I have noticed is a slight deformation at the top of the scuttle panel where it joins the door pillar. This is I think due to blast media having filled part of the void in the pillar before it being dipped. Some bodywork will be needed to fix that, but overall it looks pretty good

Saturday, 4 March 2017

Feb 2017


Working only part days at the weekends when I am back in the UK, this is obviously going to be a long term project.

The first milestone along the way was getting the chassis stripped and ready to go for Galvanizing. This was achieved early in February when I removed the last of the components fitted to the chassis and I loaded it and the new bulkhead on to the trailer ready to go to Highland Galvanizers in Cumbernauld the following weekend

Sunday 6th of February - chassis and bulkhead ready to go for Galvanizing

The new bulkhead is not in fact new but has been salvaged from a 2015 Defender. As the bulkhead is from a Puma vehicle it has a few basic differences to the one that I have discarded. These are basically

  • The vents on the scuttle panel are missing due to the more modern heater and AC system fitted to the Puma
  • There holes through the bulkhead for the heater unit are slightly different
  • The length of the flange for the transmission tunnel  is much longer
Of these differences only the length of the flange needed to be addressed as the other differences will suit future planned alterations to Wolfie.


As the shape of the flange was the same as the old one I simply cut it back using a 4" angle grinder. I will re-drill the fixing holes after the bulkhead has been galvanized.

Trimming back the flange around the transmission tunnel on the new "Puma"bBulkhead

Arriving at Highland Galvanizers

The chassis on a 130 is a significant bit of steel and needed two forklifts to unload it


With the chassis out of the way I could start to strip the 300tdi engine.

When I bought the engine it was sold with the engine"not turning" which I took to mean the engine was seized. The engine in fact does turn over freely when turned by hand, but there are some obvious issues with it. It looked as though someone had previously tried to strip it as the alternator and steering pump were partly removed, nearly all the hose clips were missing and some of the wiring loom had been cut out. What the history of this was I have no idea - it did not appear a vert military thing to have done.

The engine came apart pretty easily although I had to get the assistance of a friend to steady it when I removed the flywheel bolts.

The water pump when removed showed signs that it had failed completely as the bearings had collapsed and the impeller had gouged a large chunk out of the housing. Surprisingly the water pump actually appeared pretty new and the housing was painted in the light green colour associated with rebuilt parts for the MOD.

I can only think that the water pump had failed and the engine had overheated, which may have been the final straw as far as the MOD was concerned after which Wolfie was parked up and sold - who knows!

Removing the cylinder head was really the moment of truth as only then could I see what internal damage there was, and I would know if the engine was savable or whether a new unit was going to be needed.

The head itself looked OK - later investigation showed that one glow plug had its head missing, the injectors were pretty caked in carbon, two valve seats were cracked and the valves and guides needed replacing. But at least I do not need to buy a new cylinder head

The 300tdi before stripping


Inlet and exhaust manifolds removed


Rocker cover removed

Timing belt assembly - note the covering of oil
With the head removed I could examine the bores. It was great to see that they were in pretty good condition and that the block will be a good unit to rebuild the engine from.

The block minus the cylinder head - all the bores look OK

Things get messy - sump removed to remove crankshaft and pistons

The pile on the bench grows!

27th January

With the weather staying reasonably good for January, I have been able to make the most of my weekends at home to strip components from the chassis. All going well I should be able to take it for galvanizing in mid February.


Only the rear end to strip now!

Despite being a 1998 vehicle and having a very solid chassis a lot of the components that I removed will require either significant reworking or replacing altogether. Personally I cannot see the point in spending a lot of time and money on bodywork, internal fit out and "extras" if the basis of your vehicle is not solid.

When finished (sometime way in the future), we want to use "Wolfie" to travel in and explore some of the remoter places on the planet. The extensive rebuild that I have now started on will I hope give us the mechanical reliability needed to do so

Oil leaking from the 300tdi engine over the years has kept the front of the chassis well protected from rust

One of the largest bodywork components that I removed was the front bulkhead. With all the repair panels that are currently on the market, the bulkhead would I am sure be repairable by an experienced welder. 

Although I am not rushing through this rebuild, repairing the bulkhead was something I saw as too time consuming and so I advertised it on Ebay. Being probably a bit too optimistic the first time I advertised it it did not sell at the reserve that I set. It did not sell the second time either although there were hundreds of viewers and a number of watchers.

Wanting rid of it as I have no room to store it I advertised it with no reserve and it sold for £0.01 which saved me a trip to the tip. At least the bulkhead has a chance of being recycled!

The old bulkhead went on Ebay


Friday, 20 January 2017

16th Jan 2016


14th / 15th January

The cold but dry weather on Sunday allowed me to strip the steering column and wiring from the dashboard which meant that the bulkhead was ready for removal.


Steering column and wiring loom now removed

On Sunday I removed the bulkhead and the body member that connects the two front outriggers and which form the bottom edge of the cab floor ( I am sure that they have a proper name!).
With the bulkhead out of the way I removed the front propshaft and unbolted the gearbox mounting bolts so the gear box and transfer boxes are now ready to be lifted out.

Gear box and transfer box ready for lifting out


The front of the chassis has been well protected by a coat of engine oil! 


Gear box markings


Friday, 13 January 2017

Christmas 2016


December 2016

Having bought the Land Rover as project vehicle with a view to rebuilding it as a reliable, capable and comfortable expedition vehicle my plan was to strip it back to a bare chassis and really start from scratch there as mechanical reliability and performance is for me more a priority than the aesthetics of the vehicle. So saying that I want a vehicle that is aesthetically pleasing and comfortable as well, but reliability and capability are my main concerns


Being home for three weeks over the Christmas period allowed me time to see what I had bought and to start stripping it back to a bare chassis. 

As I plan to document this project as it progresses probably the first thing to do is to give the Land Rover a name so without a great lot of thought the Land Rover is now referred to as "Wolfie". This is basically derived from the Wolf variant Land Rover developed for the MOD and not as my son thinks named after his cat which is called Wolfgang. 

Overall "Wolfie" looked to be in pretty decent shape. Despite the wording of the advert which when I bought it advised that the rear cross member needed replaced, the chassis appeared to be in pretty good condition. 

The bodywork was as envisaged, the ambulance body itself was in pretty good condition, with a broken hinge on the rear door and a couple of scrapes along the sides being the only real issues. The Land Rover itself was a different issue as the front wings and bonnet all showed signs of wear and tear and with the usual Land Rover dents caused by people standing on them. At this stage I think my plan is to repair the wings and potentially replace the bonnet, but I will see as the bodywork stage is far off in the future.

The cab doors were in a poor state. The drivers door had been repaired with an unsightly alloy plate pop riveted on to secure the upper and lower door halves - a really bodged job and not one that I could really envisage the military condoning. The passenger door was a bit better, although the bottom of the door was showing it's age a brand new upper window section had been fitted - really at odds with the bodged repair to the drivers doors. 

The bulkhead was as expected pretty rusty - repairable, but rusty. Having bought Wolfie knowing this I had already sourced a replacement from a 2015 Defender. This newer bulkhead does not have the opening vent panels, but as the Pulse has an additional ventilation system for the rear compartment I see this as a potential opportunity to do something different re ventilation.

Mechanically Wolfie was perhaps in better condition than I had hoped. Sold as having an engine that would not turn over I had prepared myself for it being seized. The engine however turned over easily by hand, but initially it looked as though someone had been trying to strip it or repair it prior to the auction as the alternator was hanging on its wires, the jubilee clips had been removed from most of the cooling hoses and the steering box was disconnected. Later investigation uncovered a number of new nuts fitted to engine mounts and auxiliary components while the exhaust manifold had only two bolts in it and the engine /gearbox bolts were either missing or were  of a variety different types. Who had been working on the engine and what they had been trying to do remains a mystery.

The one big issue with the engine was the lack of coollant. Whether this is because the engine had overheated and seized or whether it had been drained when the jubilee clips were removed I am unsure. Only a full strip down will reveal it's actual condition.

Given the overall condition of "Wolfie" my plan to strip it back to a bare chassis and rebuild her from there remained unchanged.

Body strip out and removal.

The strip out and removal of the stretcher carriers was a pretty straightforward affair as they are simply bolted into place. The only problem was that a number of the less accessible bolts were seized in place, but they were easily dispatched with the aid of a small angle grinder.

Only the MOD could afford a product engineered to the degree that the stretcher carriers were! Removing the stretcher carriers and associated fittings and supports considerably lightened the back of the Land Rover. As I have no use for the bits that were removed, I will list them on EBay in due course.


Ambulance stretcher racks prior to removal

Before starting to remove the body itself I removed the two fuel cam holders that are slung under it just behind the front outriggers. These came off pretty easily, but I had to drill out a few of the fixing screws as the heads had corroded away. 

I also removed the trim panels in front of the rear cross member. These practically fell off as they had obviously been battered about during Wolfie's earlier life and showed signs of numerous repairs. At this stage I removed the rear lights which are contained in alloy boxes fitted to the rear cross member.

The boxed were heavily oxidised and simply pulled off the cross member. The retaining bolts were in no state to undo. During the re build I will probably lift the lights and mount them on the new rear body panel that I am planning. This will move them out of the exposed underside area and protect them from weather and impact damage - again plans for the future!

Removing the body itself proved to be a bit more complicated. The body is held in place by 8 primary fixings through the chassis and approx 20 secondary fixings through the chassis outriggers. In addition the windscreen has to be either detached either at the top or bottom (I elected to detach it at the bottom). As well as physically disconnecting the body and chassis the wiring harness has to be split and the fuel filler disconnected.

The only real problem that I encountered was with the 8 primary fixing bolts connecting the body to the chassis. These have a tapered conical end with an internal hex head (Allen key) set into the floor of the body and a bolted head under the chassis. Unfortunately the bolts were rusted solid and the position of the bolt head meant that getting a long lever on to them was impossible, so I had no alternative but to drill and cut them out. Even with the heads drilled off I had to resort to a large hammer and punch to drive the bolts out of their holes.

Removing the conical fixing bolts in the ambulance body proved to be problematic!
Stripping out the cab was pretty straight forward with the angle grinder again being used to cut the numerous seized bolts


Exposing the chassis from above after removing the seat box

Removal of the dashboard exposed the rust damage to the bulkhead

The 300tdi engine

Rust had attacked the bulkhead just below the bonnet line

Stripping the front panels

Front bodywork removed


Winter in Scotland - not ideal conditions to work outside

I recently read a comment on a Land Rover forum where someone offered the opinion that there could not be much weight in a Pulse body - do not believe it! Even with the stretcher racks and fittings removed this is still seriously heavy!!

My initial plan was to jack the body up and slide it back on to a trailer. This was soon abandoned when I realised just how heavy the body actually was.

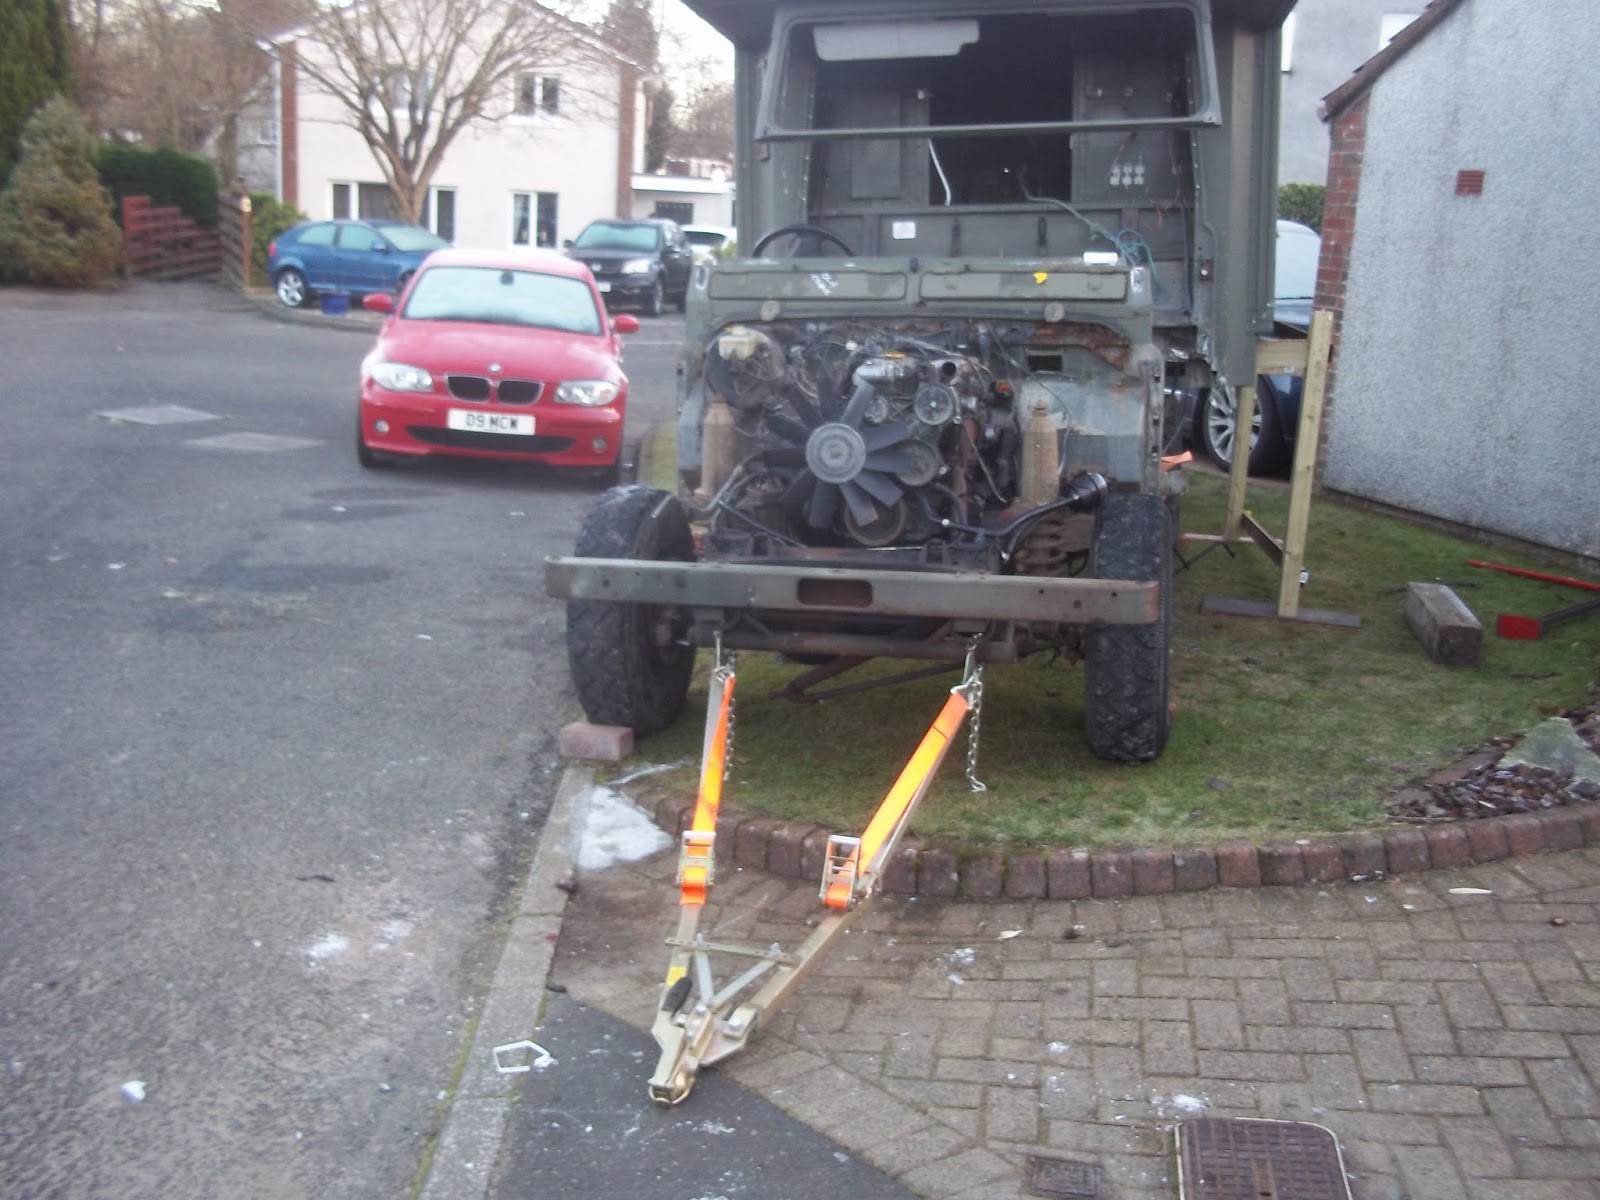
Plan "B" was to jack the body up and pull the chassis out from under the body while pulling the trailer under at the same time.

Overall things went OK, however with hindsight had I removed the riser pieces between the body and the front cross member from the body and not the chassis I would not have had to raise the body so high off the ground.


Checking to see if the body will lift

Tow frame fitted

Jacking the body off the chassis

The moment of truth

pulling the chassis out from under the ambulance body and pulling the trailer in to replace it
With the body removed the chassis was exposed. Despite a layer of surface rust and a lot of dirt the chassis overall was in surprisingly good condition.


The exposed chassis - much better condition than expected


With the body removed taking the engine out was pretty straightforward and justified the purchase of an engine crane (1/2 price on the Internet). The two ton crane effortlessly lifted the 300tdi unit off its mounts. On removal of the engine I discovered that there was a large hole in the gearbox bell housing. The hole through the alloy casting was obviously old as the edges had oxidised, but what had caused it?

Lifting out the engine

Parked in driveway awaiting bulkhead and running gear removal