Monday 27 March 2017

26th March 2017


Christmas in March - it certainly felt like it as the parts that I had bought on line over the previous 2 weeks all started to arrive!

All purchases so far have been chassis orientated as my immediate goal is to get the chassis, suspension, brakes and steering completed before I start on the engine and drive train.

Christmas obviously comes more than once a year!

Unpacking and checking everything took a bit of time. With space in my workshop limited getting the larger components mounted and out of the way became my immediate priority. 

New heavy duty front suspension turrets 
Suspension wise I had decided to stick with the original springs. The rear springs are rates at 450 lbs as opposed to the standard 330 lb heavy duty springs found on a 110 Land Rover. As hopefully our camper conversion will weigh less than the fully kitted out ambulance body and as we do not plan to carry 6 adults in the back the original spring speck should be enough.

On the front I again stuck with the original heavy duty springs which are actually the same as the rear springs on a Defender 90. If we eventually fit a winch to the front of "Wolfie" I am fairly confident that these will be up to the job, but if not a further upgrade is inexpensive and straight forward.


New turrets mounted - new suspension stops also fitted - orange 


I decided to paint the turrets black to match the chassis once I had mounted them and to paint the retaining brackets (underneath them) at the same time. The turrets are galvanised and do not really need to be painted, but as the sun was out and the paint system would dry quickly I thought that a bit of extra protection against corrosion would not go amiss and black would go better with the all black chassis.

The front turret mounts - primed and painted black to match the chassis
Other bit and pieces fitted included new suspension stops (polyurethane) above back and front axles, refurbished rear shock absorber mounts and new bushes for the rear top link arms.

I bought a bulk order 600 assorted bolts plus nuts and washers which should see the build through

Refurbished rear axle mounted with new heavy duty springs and Koni shock absorbers
Rather than replace the shock absorbers with original spec ones I decided that I would upgrade to Koni Heavy Track Raid shock absorbers which I managed to find on line for virtually the same price as the lower spec Heavy Track model. The Raid version apart from offering a design more suited to the heavier vehicle being used off road offer better dampening and with their larger capacity should not overheat if used on corrugated roads.

Koni - Heavy Track Raid shock absorbers

The only other suspension upgrade is the rear anti roll bar. Given the weight of the ambulance body I wanted to reduce potential body roll. The originals as fitted were front 25 mm diameter rear 20 mm diameter. The lighter rear anti roll bar may have been suited to the Land Rovers use as an ambulance, but as the rear ride quality is not so important to us I decided to upgrade to a 28 mm bar manufactured by Extreme 4 x 4. The new bar came with new brackets, ball joints, poly bushes and bolts. The only modification that was needed was for me to drill out the existing 8 mm mounting holes to 10 mm.

The one disadvantage of the heavier bar will be the reluctance of any suspended wheel to drop down into ruts or lower terrain if we are driving in extreme conditions. As most of our driving will be on roads made / unmade, I think reducing body roll over extreme off road capability is a good trade off.

Rear anti roll bar - 28 mm from Extreme 4 x 4 - the bright orange colour certainly makes it stand out!

The old brake disks were heavily corroded and had significant pitting on their faces
The existing brakes were in a poor condition with the disks heavily pitted and the calipers seized on to them. I am planning to refurbish the calipers, but the disks were beyond repair and so I had ordered new ones.

Next the front axle is ready for refurbishment and re building

Although some progress has been made the back axle still needs to be rebuilt. I was unable to drive out the old bearing shells from within the hubs which stopped any progress there over the weekend, but luckily a friend who has a large hydraulic press has offered to press them out during the course of this week. He will also drive out the old bushes from the front radius arms at the same time (thanks Iain!) which will save me some time.

Monday 20 March 2017

19th March 2017


Saturday morning and off to Highland Galvanisers in Cumbernauld to collect the chassis and bulkhead, all of which came nicely gift wrapped

Ready to be unwrapped
As I mentioned in an earlier post, due to a production error at Highland Galvanisers the chassis ended up being prepared for powder coating after it was galvanised. Realising the mistake I was given the option of free powder coating which saved Highland Galvanisers the cost of having to strip the chassis again and re-galvanise it.

The Powder coating really makes the chassis look new


Unfortunately when the chassis was palatalised and wrapped for shipping it was upside down so before setting it on to some axle stands I had to turn it over. Once again the engine crane came in handy and I was glad that I had bought a 2 ton crane rather than a lighter one.


During the course of last week I ordered all the bits that I would need to rebuild the chassis to the stage where it would have suspension and steering.

The first parts to be delivered were 2 new rear springs. These springs are much heavier duty than is found on most land rovers (ANR 3540) being rated at 430 lbs each. When sourcing them I found that  Island  4 x 4 had them on offer at half the price of some of the larger suppliers - in fact not many suppliers actually offered them as a available part. 

Before ordering the springs I found that there was very little information available about them on line, probably due to the fact that they are not a common part. Having contacted a number of suppliers I was unable to find out what height the springs should be when new and therefore I was unable to compare the new height to the height of my existing springs to see how much they had settled. 

While there is no apparent damage to the original springs they are heavily coated in rust which in itself is perhaps not a major problem, but as I am replacing the front springs and all 4 shock absorbers I decided that the opportunity to get new rear springs at a reduced price was too good to pass up on. 

New rear springs

Chassis set up under cover for the rebuild
With the chassis back it is time to start refurbishing the front and rear axles. Having checked the back lash on the differential there is very little movement in it and well within the 10 mm tolerance quoted in the workshop manual. As the diff turns freely without feeling rough I do not intend to strip it at this stage, but I will replace the seals and bearings along with the brake disks. Hopefully the callipers and back plates can be refurbished which will save a few pennies!

Draining the oil from the rear axle ready for stripping and rebuilding
The bulkhead also came back from the galvanisers. I had been concerned that it may warp given the heat of the galvanising process, but it looks to be pretty straight. One thing I have noticed is a slight deformation at the top of the scuttle panel where it joins the door pillar. This is I think due to blast media having filled part of the void in the pillar before it being dipped. Some bodywork will be needed to fix that, but overall it looks pretty good

Saturday 4 March 2017

Feb 2017


Working only part days at the weekends when I am back in the UK, this is obviously going to be a long term project.

The first milestone along the way was getting the chassis stripped and ready to go for Galvanizing. This was achieved early in February when I removed the last of the components fitted to the chassis and I loaded it and the new bulkhead on to the trailer ready to go to Highland Galvanizers in Cumbernauld the following weekend

Sunday 6th of February - chassis and bulkhead ready to go for Galvanizing

The new bulkhead is not in fact new but has been salvaged from a 2015 Defender. As the bulkhead is from a Puma vehicle it has a few basic differences to the one that I have discarded. These are basically

  • The vents on the scuttle panel are missing due to the more modern heater and AC system fitted to the Puma
  • There holes through the bulkhead for the heater unit are slightly different
  • The length of the flange for the transmission tunnel  is much longer
Of these differences only the length of the flange needed to be addressed as the other differences will suit future planned alterations to Wolfie.


As the shape of the flange was the same as the old one I simply cut it back using a 4" angle grinder. I will re-drill the fixing holes after the bulkhead has been galvanized.

Trimming back the flange around the transmission tunnel on the new "Puma"bBulkhead

Arriving at Highland Galvanizers

The chassis on a 130 is a significant bit of steel and needed two forklifts to unload it


With the chassis out of the way I could start to strip the 300tdi engine.

When I bought the engine it was sold with the engine"not turning" which I took to mean the engine was seized. The engine in fact does turn over freely when turned by hand, but there are some obvious issues with it. It looked as though someone had previously tried to strip it as the alternator and steering pump were partly removed, nearly all the hose clips were missing and some of the wiring loom had been cut out. What the history of this was I have no idea - it did not appear a vert military thing to have done.

The engine came apart pretty easily although I had to get the assistance of a friend to steady it when I removed the flywheel bolts.

The water pump when removed showed signs that it had failed completely as the bearings had collapsed and the impeller had gouged a large chunk out of the housing. Surprisingly the water pump actually appeared pretty new and the housing was painted in the light green colour associated with rebuilt parts for the MOD.

I can only think that the water pump had failed and the engine had overheated, which may have been the final straw as far as the MOD was concerned after which Wolfie was parked up and sold - who knows!

Removing the cylinder head was really the moment of truth as only then could I see what internal damage there was, and I would know if the engine was savable or whether a new unit was going to be needed.

The head itself looked OK - later investigation showed that one glow plug had its head missing, the injectors were pretty caked in carbon, two valve seats were cracked and the valves and guides needed replacing. But at least I do not need to buy a new cylinder head

The 300tdi before stripping


Inlet and exhaust manifolds removed


Rocker cover removed

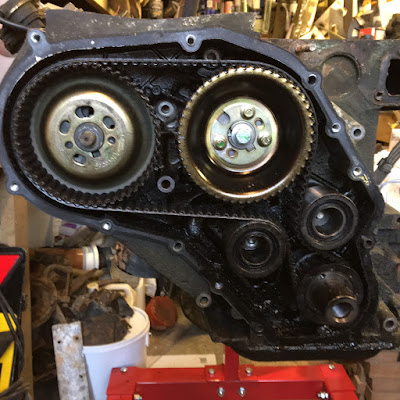
Timing belt assembly - note the covering of oil
With the head removed I could examine the bores. It was great to see that they were in pretty good condition and that the block will be a good unit to rebuild the engine from.

The block minus the cylinder head - all the bores look OK

Things get messy - sump removed to remove crankshaft and pistons

The pile on the bench grows!

27th January

With the weather staying reasonably good for January, I have been able to make the most of my weekends at home to strip components from the chassis. All going well I should be able to take it for galvanizing in mid February.


Only the rear end to strip now!

Despite being a 1998 vehicle and having a very solid chassis a lot of the components that I removed will require either significant reworking or replacing altogether. Personally I cannot see the point in spending a lot of time and money on bodywork, internal fit out and "extras" if the basis of your vehicle is not solid.

When finished (sometime way in the future), we want to use "Wolfie" to travel in and explore some of the remoter places on the planet. The extensive rebuild that I have now started on will I hope give us the mechanical reliability needed to do so

Oil leaking from the 300tdi engine over the years has kept the front of the chassis well protected from rust

One of the largest bodywork components that I removed was the front bulkhead. With all the repair panels that are currently on the market, the bulkhead would I am sure be repairable by an experienced welder. 

Although I am not rushing through this rebuild, repairing the bulkhead was something I saw as too time consuming and so I advertised it on Ebay. Being probably a bit too optimistic the first time I advertised it it did not sell at the reserve that I set. It did not sell the second time either although there were hundreds of viewers and a number of watchers.

Wanting rid of it as I have no room to store it I advertised it with no reserve and it sold for £0.01 which saved me a trip to the tip. At least the bulkhead has a chance of being recycled!

The old bulkhead went on Ebay